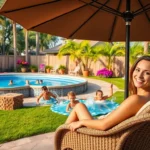
We all dream of having that perfect outdoor space where we can relax and entertain, but extending our patio doesn’t have to drain our bank account. With some creativity and smart planning, we can transform our small outdoor area into a beautiful extension that feels like a natural part of our home.
Budget-friendly patio extensions aren’t just about saving money – they’re about maximizing the potential of our existing space. Whether we’re working with a tiny balcony or a modest backyard, there are countless ways to expand our outdoor living area without very costly.
From simple DIY platforms to creative multi-level designs, we’ll explore practical answers that deliver maximum impact for minimal investment. These ideas will help us create the outdoor oasis we’ve been dreaming of while keeping our finances firmly in check.
Define Your Patio Extension Goals and Budget Parameters
Smart planning starts with understanding exactly what you want to achieve and how much you’re willing to invest in your patio transformation.
Assess Your Current Patio Space and Limitations
Measure your existing space accurately to determine the maximum extension size possible. We recommend using a tape measure to record length, width, and any obstacles like trees, utility lines, or property boundaries that might affect your design.
Examine the current surface condition to understand what foundation work you’ll need. Concrete slabs, wooden decks, and bare ground each require different approaches and budget considerations for extension projects.
Identify structural limitations that could impact your extension plans. Check for drainage issues, slopes, or underground utilities that might require professional consultation or additional costs.
Document sun exposure patterns throughout the day to optimize your extension’s functionality. Morning sun areas work well for breakfast nooks, while afternoon shade zones are perfect for relaxation spaces.
Set a Realistic Budget Range for Your Project
Establish a total project budget before exploring exact extension ideas. Most successful patio extensions cost between $500 to $3,000 for DIY projects, depending on size and materials chosen.
Allocate 20% of your budget for unexpected expenses or material price fluctuations. This buffer helps prevent project delays and ensures you can complete your extension without financial stress.
Research local material costs at multiple suppliers to find the best deals. Home improvement stores, lumber yards, and online retailers often have different pricing structures that can significantly impact your total investment.
Consider seasonal timing to maximize your budget effectiveness. Fall and winter months typically offer better deals on outdoor materials and contractor services if professional help becomes necessary.
Prioritize Must-Have Features Versus Nice-to-Have Additions
List essential functions your patio extension must serve before considering decorative elements. Primary needs like additional seating, dining space, or weather protection should receive budget priority over aesthetic upgrades.
Rank features by usage frequency to guide your spending decisions. Daily use items like durable flooring and comfortable seating deserve more investment than occasional entertainment features.
Plan for future upgrades by choosing extension designs that allow gradual improvements. Basic structures can accommodate lighting, planters, or pergolas as your budget allows over time.
Create a phased implementation timeline to spread costs across multiple seasons. Start with essential structural elements and add decorative features or comfort upgrades in subsequent budget cycles.
Create Additional Seating Areas Using Affordable Materials

Expanding your seating capacity doesn’t require expensive furniture purchases. We can maximize comfort and functionality using creative answers that fit within your established budget parameters.
Build Simple Wooden Benches from Reclaimed Lumber
Reclaimed lumber offers an excellent foundation for custom seating projects that won’t strain your budget. We recommend checking local construction sites, demolition projects, or salvage yards for weathered wood pieces that can be transformed into sturdy benches. Building simple wooden benches allows complete control over dimensions and style while recycling materials that might otherwise end up in landfills.
Start by measuring your patio space to determine optimal bench lengths. Cut reclaimed boards to size and sand rough surfaces smooth for comfortable seating. Apply outdoor wood stain or sealant to protect against moisture and UV damage. The rustic character of reclaimed wood adds natural charm to any patio extension while keeping costs significantly lower than purchasing new lumber.
Repurpose Old Furniture for Outdoor Seating Answers
Indoor furniture pieces can be successfully converted into outdoor seating with minimal investment. We suggest examining chairs, stools, or benches that might be stored in basements, garages, or spare rooms for potential outdoor use. Transform these pieces using weatherproof paint or marine grade sealant to create durable patio seating.
Clean furniture thoroughly before applying protective coatings. Sand glossy surfaces lightly to ensure proper paint adhesion. Choose outdoor exact paints in colors that complement your patio design. Add weather resistant cushions for enhanced comfort and style. This approach saves money while reducing waste by giving old furniture new life in your extended outdoor space.
Use Concrete Blocks and Cushions for Modern Seating
Concrete blocks combined with outdoor cushions create contemporary seating arrangements at fraction of traditional furniture costs. We can stack blocks in various configurations to form benches, corner seating, or even low tables for versatile outdoor arrangements. This modular approach allows easy reconfiguration as your patio needs change over time.
Purchase standard concrete blocks from home improvement stores for consistent sizing and appearance. Stack blocks to desired height, typically 16 to 18 inches for comfortable seating. Add outdoor cushions in weather resistant fabrics to enhance comfort and introduce color to your patio extension. The clean lines and modern aesthetic work particularly well with contemporary patio designs while maintaining budget friendly construction costs.
Expand Your Patio Footprint with DIY Ground Coverings

Transforming your outdoor space doesn’t require expensive hardscaping when you use smart ground covering answers. We’ll show you three proven methods that dramatically increase your patio’s usable area while keeping costs under control.
Install Gravel or Decomposed Granite for Natural Extensions
Gravel installations offer the most budget-friendly option for extending your patio footprint with minimal groundwork required. We recommend using crushed gravel or decomposed granite (DG) as these materials cost significantly less than traditional paving options and provide excellent drainage properties.
Start by marking your desired patio area using spray paint or stakes to define the boundaries. Excavate 2-3 inches of soil to create a stable base, then lay industry fabric across the entire area to prevent weed growth. Spread your chosen material evenly and compact it using a hand tamper or plate compactor for optimal stability.
Add edging materials like concrete strips or metal borders to contain the gravel and maintain clean lines. This natural approach works particularly well with rustic or contemporary design styles and allows for easy customization of shapes and sizes. Keep in mind that gravel surfaces may shift over time and require occasional raking to maintain their appearance.
Use Concrete Pavers for Cost-Effective Floor Expansion
Concrete pavers deliver exceptional value when combined with pea gravel or sand filling between joints. Level the ground thoroughly and install a weed barrier before arranging pavers in attractive patterns such as grid layouts or flowing wave designs.
Fill gaps between pavers with pea gravel to create a cohesive surface that handles foot traffic well while maintaining proper drainage. This method produces clean, modern aesthetics perfect for dining areas or seating zones. Concrete pavers resist weather damage better than natural stone alternatives and offer consistent sizing for easier installation.
Consider mixing paver sizes and colors to add visual interest without increasing material costs significantly. The installation requires moderate skill levels but remains well within DIY capabilities for most homeowners willing to invest weekend time.
Create Stepping Stone Pathways to Connect Spaces
Stepping stone installations provide affordable connectivity between your existing patio and yard areas without requiring extensive paving work. Set individual stones into existing grass or create gravel beds underneath each stone for enhanced stability.
Space stones 18-24 inches apart to accommodate comfortable walking strides while using minimal materials. Stone or concrete stepping stones work equally well and can be found at competitive prices through local suppliers or home improvement centers.
Link multiple outdoor zones using curved or straight pathways that guide guests naturally through your expanded space. This approach adds functional square footage while creating visual flow that makes small yards appear larger than their actual dimensions.
| Ground Covering Method | Cost Level | Installation Difficulty | Primary Benefits |
|---|---|---|---|
| Gravel/Decomposed Granite | Very Low | Easy | Excellent drainage, flexible shapes |
| Concrete Pavers | Low to Medium | Moderate | Durable surface, modern appearance |
| Stepping Stone Pathways | Low | Easy | Connects spaces, adds charm |
Add Vertical Elements to Maximize Small Patio Spaces

Smart vertical answers transform cramped patios into functional outdoor havens without expanding the footprint. We’ll show you how to use walls and overhead space to create privacy, shade, and visual appeal while staying within budget.
Install Trellises and Climbing Plants for Privacy Screens
Trellises offer an affordable way to create natural privacy barriers that enhance your patio’s beauty. We recommend installing simple wooden or metal trellises along property lines or against walls where you need screening from neighbors or unsightly views. Basic trellis panels cost between $20 to $50 each and require minimal installation skills.
Climbing plants like ivy, clematis, or jasmine grow quickly on these structures and provide dense coverage within one growing season. We’ve found that jasmine creates fragrant screens while clematis adds colorful blooms throughout summer months. These plants establish living walls that block unwanted views while adding greenery to your extended patio space.
Installation takes just a few hours using basic tools and hardware store materials. We suggest securing trellises to fence posts or wall brackets for stability during windy conditions. This natural screening solution costs significantly less than traditional fencing while delivering privacy and aesthetic appeal.
Build Simple Pergolas Using Basic Construction Materials
Pergolas add architectural interest and partial shade without requiring complex construction skills. We recommend starting with basic wooden frame kits that cost between $200 to $600 and can be assembled in a weekend. These structures create defined outdoor rooms that expand your patio’s functional space upward.
Simple pergola designs using standard lumber dimensions keep costs manageable for most budgets. We’ve successfully built pergolas using 2×8 beams and 2×2 slats that provide adequate shade and support for climbing plants. Repurposed materials like reclaimed timber or pallet wood reduce expenses even further while adding rustic character.
DIY pergola construction requires basic carpentry tools and follows straightforward assembly steps. We suggest positioning pergolas over seating areas or dining spaces to create comfortable zones protected from harsh sunlight. These overhead structures serve as frameworks for hanging planters, lights, or outdoor curtains that enhance your patio extension.
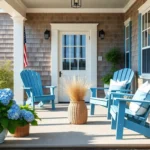
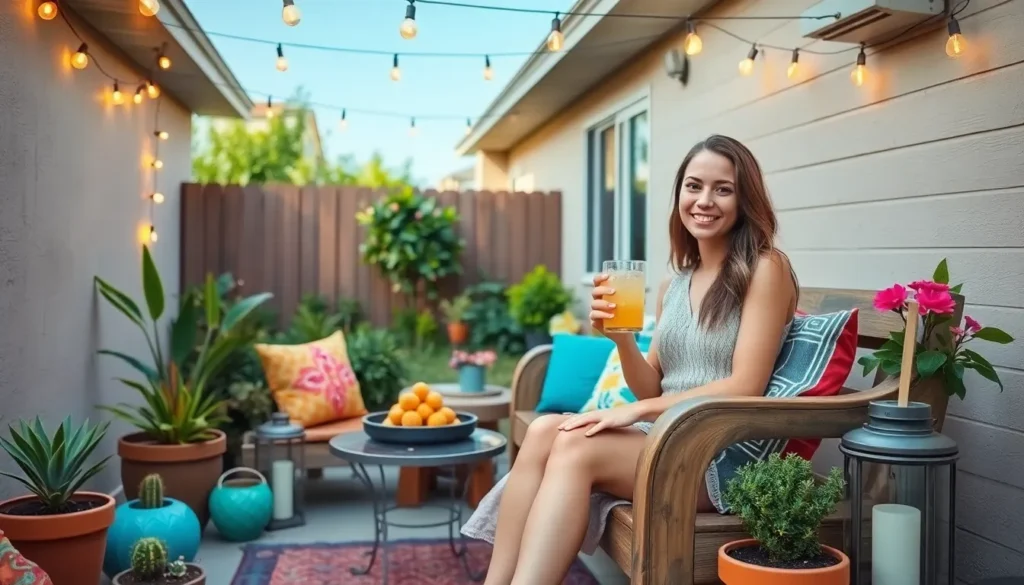
Hang String Lights and Outdoor Curtains for Ambiance
String lights transform any patio extension into an inviting evening retreat for minimal investment. We recommend LED string lights that cost between $15 to $40 and provide warm illumination without increasing electricity bills significantly. These lights attach easily to pergolas, trellises, or wall mounted brackets.
Outdoor curtains made from weather resistant fabrics create intimate spaces while adding color and texture to vertical elements. We’ve found that outdoor curtains costing $30 to $80 per panel soften hard surfaces and provide flexible privacy options. These fabric panels hang from pergola beams or curtain rods mounted on walls.
Combined lighting and curtain installations create cozy outdoor rooms that extend patio use into evening hours. We suggest using timer controlled string lights and machine washable curtain fabrics for easy maintenance. This affordable combination delivers restaurant quality ambiance that makes your extended patio space feel like a professional outdoor design.
Design Functional Zones Within Your Extended Patio Area

Creating distinct zones transforms your patio extension from a single space into multiple functional areas. Visual separation using materials like gravel or inexpensive pavers helps define each area without costly construction.
Create a Dedicated Dining Space with Budget-Friendly Tables
Budget-friendly dining options include simple picnic tables, foldable tables, or secondhand outdoor sets that deliver functionality without overspending. Position your dining zone on flat ground or over a gravel patio extension for optimal stability and comfort. Lightweight furniture offers flexibility for easy rearrangement, maximizing both space usage and seasonal adaptability.
Secondhand outdoor furniture provides excellent value when cleaned and refreshed with weatherproof treatments. Folding tables store easily during off-seasons and accommodate varying group sizes for entertaining. Adding inexpensive outdoor umbrellas or shade sails enhances dining comfort while maintaining your budget parameters.
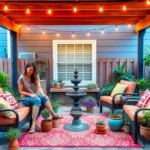
Establish a Relaxation Corner with Affordable Outdoor Rugs
Affordable outdoor rugs define cozy seating zones while adding color and texture economically to your extended space. Weather-resistant rugs work perfectly over gravel or cement patios to designate exact lounge areas with visual appeal. Pairing rugs with budget seating options like DIY pallet sofas or refreshed secondhand chairs creates comfortable retreats.
Outdoor rugs anchor furniture groupings and prevent seating from appearing scattered across your extension. Washable options maintain their appearance with minimal maintenance costs throughout multiple seasons. Strategic rug placement guides traffic flow between your newly created zones naturally.
Add a Fire Feature Using Inexpensive Fire Bowls or DIY Pits
Metal fire bowls offer affordable alternatives to costly built-in fire pits while providing the same warmth and ambiance benefits. DIY fire pits using bricks or stones sourced inexpensively create permanent focal points without complex construction requirements. Portable fire features increase your patio’s usability during cooler evenings while staying within reasonable budget limits.
Safe and easy-to-assemble fire options eliminate the need for permits or professional installation in most areas. Building simple fire pits with basic materials like fire bricks creates lasting features that enhance both functionality and property value. Combining large square pavers with pea gravel around fire features gives a clean, modern appearance that’s both affordable and DIY-friendly.
Incorporate Greenery and Natural Elements Economically

Adding natural elements transforms our patio extension while keeping costs remarkably low. We’ll explore three proven methods that bring lush beauty to our outdoor space without very costly.
Plant Container Gardens Using Repurposed Planters
Transforming old buckets, wooden crates, and other discarded containers into vibrant planters creates stunning focal points throughout our patio space. We can source these materials from local construction sites, garage sales, or even our own storage areas to dramatically reduce costs compared to purchasing new planters.
Container gardening offers incredible flexibility for our patio design since we can easily relocate plants as seasons change or our layout preferences evolve. Old metal buckets work perfectly for herbs like basil and mint, while wooden wine crates accommodate larger flowering plants and small shrubs.
Drainage becomes simple when we drill several holes in the bottom of each repurposed container and add a layer of gravel before soil. This approach allows us to customize our plant selection based on available sunlight and creates visual interest through varying container heights and textures.
Install Raised Garden Beds Along Patio Borders
Building raised beds from reclaimed wood or affordable cinder blocks defines our patio edges while creating natural privacy barriers that enhance the overall aesthetic. We can construct these beds for a fraction of traditional landscaping costs by sourcing materials from lumber yards or construction sites.
Cinder blocks stack easily without mortar, creating clean lines that complement modern patio designs while providing excellent drainage for plants. Reclaimed wood offers a rustic charm that works beautifully with casual outdoor spaces, and we can customize dimensions to fit our exact patio layout.
These border gardens serve multiple purposes by suppressing weeds, retaining soil, and creating easy maintenance zones that keep our patio looking polished. We can plant low maintenance perennials, herbs, or seasonal flowers depending on our gardening preferences and local climate conditions.
Use Mulch and River Rocks for Low-Cost Landscaping
Mulch provides an incredibly cost effective way to create finished, professional looking landscaping around our patio extension while suppressing weeds and retaining soil moisture. We can often source free mulch from local tree services or municipal composting programs, making this option extremely budget friendly.
River rocks add texture and durability to our industry design, working perfectly as natural borders around plant beds or as attractive ground cover accents. These materials require minimal maintenance once installed and blend seamlessly with both contemporary and traditional patio styles.
Combining mulch around plants with river rock pathways or borders creates visual contrast that enhances our patio’s overall appeal. We can use darker mulch to make colorful flowers pop while lighter colored river rocks brighten shadowy areas and create defined walking surfaces between different patio zones.
Enhance Your Extended Patio with Budget Lighting Solutions

Proper lighting transforms your newly extended patio into a magical evening retreat without straining your budget. Strategic illumination creates ambiance, improves safety, and extends your outdoor entertaining hours well into the night.
Install Solar-Powered Lights for Energy-Efficient Illumination
Solar-powered lights offer the perfect combination of cost savings and convenience for budget-conscious homeowners. These energy-efficient fixtures eliminate electrical wiring requirements, making installation incredibly simple for DIY enthusiasts. We recommend placing solar path lights along walkways and patio edges to create defined boundaries while improving safety during nighttime navigation.
Most solar lights cost between $10 to $30 per fixture and provide 6 to 8 hours of illumination after a full day’s charge. Consider solar spotlights for highlighting exact features like planters or architectural elements within your extended patio area. String solar lights work exceptionally well for overhead coverage, creating a warm canopy effect that mimics expensive hardwired lighting systems.
Maintenance remains minimal since solar fixtures require only occasional cleaning and battery replacement every 2 to 3 years. Position lights in areas receiving direct sunlight for at least 6 hours daily to ensure optimal performance throughout the evening hours.
Create Mason Jar Lanterns and Candle Displays
Mason jar lanterns provide charming, rustic lighting that costs significantly less than traditional outdoor fixtures. Transform standard mason jars into stunning luminaries using battery-operated fairy lights, candles, or solar lids designed specifically for mason jar lighting projects. We’ve found that 12-ounce jars work best for tabletop displays, while quart-sized jars create impressive hanging installations.
DIY enthusiasts can create 6 to 8 mason jar lanterns for under $25 using supplies from dollar stores and create shops. Add decorative elements like colored sand, pebbles, or dried flowers to customize each lantern’s appearance and match your patio’s aesthetic theme. Battery-operated tea lights eliminate fire hazards while providing consistent illumination throughout entire evenings.
Hanging mason jar displays work particularly well along pergola beams or fence lines within your extended patio space. Group odd numbers of lanterns together for visual appeal, creating focal points that draw attention to exact seating or dining areas.
Use Battery-Operated LED Strips for Accent Lighting
Battery-operated LED strips deliver professional-looking accent lighting without complicated electrical work or high installation costs. These flexible lighting answers cost between $15 to $40 per 16-foot strip and provide 20 to 50 hours of continuous operation depending on battery quality and LED density.
Install LED strips under railings, benches, or stair treads to create safety lighting that prevents trips and falls during evening gatherings. We recommend choosing warm white LEDs over cool white options since they create more inviting, comfortable ambiance for outdoor relaxation and entertainment.
Adhesive backing makes installation straightforward on most surfaces, though we suggest using additional mounting clips for long-term durability in outdoor environments. Remote-controlled LED strips offer convenient operation from anywhere within your patio area, allowing you to adjust brightness levels or activate different lighting modes without leaving your seat.
Waterproof ratings of IP65 or higher ensure reliable performance during light rain or morning dew exposure. Battery packs typically hide easily behind planters or under furniture, maintaining clean aesthetic lines throughout your extended patio lighting design.
Protect Your Investment with Affordable Weather Solutions

Creating beautiful outdoor extensions requires smart protection strategies that shield your investment from harsh weather conditions. We’ll explore practical methods to safeguard your patio materials while maintaining comfort throughout different seasons.
Add Shade Using Budget-Friendly Umbrellas and Canopies
Market umbrellas offer flexible shade coverage at a fraction of permanent structure costs. These versatile options range from $50 to $200 and provide adjustable protection that moves with the sun’s path throughout the day.
Cantilever umbrellas maximize coverage area without center poles interfering with furniture placement. We recommend selecting models with UV-resistant fabric and sturdy aluminum frames that withstand moderate wind conditions.
Pop-up canopies create instant shelter for larger gatherings and special events. Budget options starting around $100 provide 10×10 feet of coverage and store compactly when not needed.
Sail shades deliver modern aesthetic appeal while blocking up to 95% of harmful UV rays. Installing multiple triangular or square sails creates ever-changing visual interest and comprehensive coverage for under $300.
Install Outdoor Curtains for Wind and Sun Protection
Weather-resistant curtains transform open pergolas into comfortable, private retreats that block both wind and intense sunlight. Outdoor fabric options resist fading and mildew while maintaining their appearance season after season.
Grommeted panels slide easily along curtain rods or wire systems, allowing quick adjustment based on weather conditions. We suggest choosing neutral colors like beige or gray that complement various patio styles.
Tab-top curtains offer budget-friendly installation using simple curtain rods mounted to pergola beams or fence posts. These lightweight options typically cost $20 to $50 per panel and create instant privacy screens.
Tie-back systems provide versatility by securing curtains open during calm weather and releasing them when protection becomes necessary. This functionality extends outdoor season comfort without permanent structural changes.
Apply Weather-Resistant Sealers to Preserve Materials
Concrete sealers extend patio life significantly by preventing moisture penetration that causes cracking and surface damage. Quality acrylic sealers cost $30 to $60 per gallon and cover approximately 300 square feet.
Stone and brick surfaces benefit from penetrating sealers that protect against freeze-thaw cycles and salt damage. We recommend applying these products every 2-3 years to maintain optimal protection levels.
Wood elements require annual sealing using products specifically formulated for outdoor conditions. Clear sealers preserve natural wood appearance while providing moisture and UV protection for around $40 per gallon.
Application timing matters greatly for sealer effectiveness and longevity. Schedule sealing projects during dry weather periods with temperatures between 50-90°F for optimal penetration and curing results.
Conclusion
Creating a stunning patio extension doesn’t require very costly when you apply these budget-conscious strategies. We’ve shown that with careful planning and creative thinking, you can transform your outdoor space using affordable materials like reclaimed lumber, concrete blocks, and repurposed items.
The key lies in prioritizing essential features first and implementing your vision in phases. By focusing on DIY answers, smart material choices, and multi-functional elements, you’ll achieve professional-looking results at a fraction of traditional costs.
Remember that protection and maintenance are crucial investments that’ll extend your patio’s lifespan. With proper weatherproofing and seasonal care, your budget-friendly extension will provide years of enjoyment and relaxation for family and friends.
Frequently Asked Questions
What’s a realistic budget for a DIY patio extension project?
Most successful DIY patio extension projects cost between $500 to $3,000. It’s recommended to allocate 20% of your budget for unexpected expenses and research local material costs for the best deals. Start by defining your goals and prioritizing must-have features over nice-to-have additions to stay within budget.
How can I create affordable seating for my extended patio?
Build simple wooden benches from reclaimed lumber sourced from construction sites or salvage yards. Repurpose old indoor furniture by applying weatherproof paint or sealant. Use concrete blocks combined with outdoor cushions to create modern, versatile seating arrangements that cost a fraction of traditional outdoor furniture.
What are the most budget-friendly ground covering options?
Install gravel or decomposed granite for an affordable, low-maintenance surface. Use concrete pavers for a more structured look, or create stepping stone pathways for visual interest. These options provide durability and style while keeping costs significantly lower than premium materials like natural stone or composite decking.
How can I add greenery without spending too much money?
Create container gardens using repurposed planters like old buckets and wooden crates. Install raised garden beds along patio borders using reclaimed wood or cinder blocks. Use mulch and river rocks for low-cost landscaping that suppresses weeds while adding texture and visual appeal to your outdoor space.
What lighting solutions work best for budget-conscious patio extensions?
Solar-powered lights offer energy-efficient illumination with easy installation and low ongoing costs. Create DIY mason jar lanterns or use battery-operated LED strips for accent lighting. String lights and outdoor curtains can transform your patio into an inviting evening retreat while maintaining budget-friendly appeal.
How can I protect my patio investment from weather damage?
Use weather-resistant sealers to preserve materials and ensure longevity. Install budget-friendly shade options like market umbrellas, pop-up canopies, or sail shades. Add outdoor curtains for wind and sun protection. These protective measures help maintain your investment while enhancing comfort throughout different seasons.
Can I expand my patio in phases to spread out costs?
Yes, planning a phased implementation timeline allows you to spread costs across multiple seasons. Start with essential functions like seating and dining space, then add features like lighting, greenery, and decorative elements in later phases. This approach helps manage your budget while allowing for future upgrades.