How You Can Safely Grill in a Screened-In Porch Without Risk
Start by checking your local fire codes. Different areas have different rules about grilling indoors, and you need to know what’s allowed where you live before you do anything else.
Choose the right grill for indoor use. Electric or infrared grills produce minimal smoke and carbon monoxide, making them much safer than charcoal or traditional gas grills in enclosed spaces. The reduced emissions mean less buildup of dangerous fumes in your porch area.
Set up cross-ventilation to move air through the space. Open windows on opposite sides of your porch, or run an exhaust fan with at least 300 CFM (cubic feet per minute) of power. Turn on ventilation before you start cooking, keep it running while you grill, and leave it on for 15 minutes after you finish.
Position your grill carefully in the space. Keep it at least 3 feet away from screens and walls to prevent heat damage from warping or discoloring materials. This distance also reduces the risk of accidentally setting something nearby on fire.
Keep a fire extinguisher within arm’s reach of your grill. You should be able to grab it without stepping away from the cooking area. Clean out grease buildup from your grill monthly, since accumulated grease catches fire more easily than a clean cooking surface.
Never leave your grill unattended while it’s on. Even a few minutes away from the grill is too long. Stay present and watchful throughout the entire cooking process.
Can You Safely Grill in a Screened-In Porch?

Can You Safely Grill in a Screened-In Porch?
Yes, you can grill in a screened-in porch. It takes planning, but it’s doable with the right setup.
Grilling in a screened-in porch is possible with proper planning and the right setup to ensure safety and comfort.
Ventilation Matters Most
Smoke buildup is your biggest concern. Your porch needs to move air freely—think of it like letting your space breathe naturally. Open panels or cross-breezes work best. If your porch is fully enclosed, smoke will get trapped and make the space uncomfortable. You need at least one open side or window to let air flow in and smoke flow out.
Position Your Grill Carefully
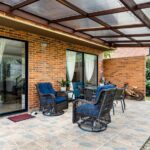
Place your grill at least 3 feet away from screens, walls, and furniture. This distance gives you a safety buffer. Screens melt easily from heat, and walls can catch fire if they get too hot. I’ve seen people position grills just 1 foot from a screen and regret it within minutes—the screen started warping from the heat alone.
Choose the Right Grill Type
Electric or infrared grills are your best options for a screened porch. They produce less smoke than charcoal or gas models. Gas grills need outdoor venting and can still produce more smoke than you’d want indoors. Charcoal creates the most smoke and heat, making it the worst choice for enclosed spaces.
Have a Fire Extinguisher Ready
Keep one within arm’s reach of where you’re grilling. A 5-pound multipurpose extinguisher works well for most home setups. Mount it on a nearby wall or table where you can grab it in seconds if needed.
Why Ventilation Is Your First Line of Defense

When you grill in a screened-in porch, you’re managing three connected problems: keeping smoke moving, removing it completely, and preventing carbon monoxide from building up inside.
Start with cross-breeze air movement. This means creating a path where fresh air enters on one side of the porch while smoke exits on the other. If your porch runs east to west, open windows or vents on the east side and leave the west side open for air to escape. The breeze does the work for you.
Pair this natural air movement with a mechanical system. A ceiling exhaust fan rated for at least 300 cubic feet per minute (CFM) works well for most standard porches around 200 square feet. Alternatively, you can install open panels or louvers near the top of two opposite walls. Hot smoke naturally rises, so positioning these vents high pulls the air upward and out.
The timing matters here. Turn on your exhaust fan five minutes before you start grilling. Let it run continuously while you cook and for 15 minutes after you finish. This keeps smoke from settling.
Getting ventilation right from the start stops dangerous situations before they start. A poorly ventilated porch fills with smoke within 10 to 15 minutes of grilling, making it uncomfortable and unsafe. A properly ventilated one stays clear throughout your meal.
Cross-Breeze Air Movement
Air moves out of a screened porch during grilling because you create natural ventilation by opening doors or panels on opposite sides. Air enters from one direction and exits from another, carrying smoke and fumes along with it instead of letting them collect around you.
Think of it like a hallway. When you open a door at each end, air flows straight through without stopping. You’re building a pathway that pushes smoke outside rather than trapping it in your space.
Position your grill at least 3 to 4 feet away from walls and screens. Distance matters because smoke needs room to spread out as it moves. The farther your grill sits from surfaces, the better the smoke disperses before reaching you or your guests.
On calm days when natural breeze feels thin, a ceiling fan can help. Run it on low to medium speed to keep air moving steadily through the space without creating drafts that blow ash around. A standard 52-inch ceiling fan works well for most screened porches and moves air quietly in the background.
Smoke Removal Systems
Most grilling accidents in screened porches happen because smoke builds up faster than people expect. Your ventilation system is your main defense against this problem. The speed of smoke removal depends directly on how well your screen ventilation works.
Start by installing ceiling exhaust fans or positioning outdoor fans to create cross-breeze movement. These fans push smoke out efficiently by forcing air to flow through the space. Open windows on opposite sides of your porch. This natural airflow pattern works like a pathway for smoke—it enters from one side and exits from the other, removing dangerous gases like carbon monoxide before they build up to unsafe levels.
If permanent fixtures aren’t realistic for your situation, portable smoke evacuators offer a practical alternative. These systems pull smoke away from your breathing zone immediately and can be moved or stored when not in use.
Maintenance prevents problems before they start. Clean grease buildup from your grill once a month, and use drip guards under the cooking grates. Grease buildup causes flare-ups, which produce excess smoke. When you reduce flare-ups, you reduce smoke production, which means your ventilation system won’t have to work as hard to keep the air safe.
Carbon Monoxide Prevention
Why Your Grill Produces Carbon Monoxide
When gas or charcoal burns incompletely, it creates carbon monoxide—an invisible, odorless gas that’s hard to detect. In enclosed spaces like screened porches or garages, CO builds up quickly and becomes dangerous to breathe.
Creating Proper Ventilation
Your first line of defense is airflow. Open windows and doors on opposite sides of your space to create cross-ventilation, allowing fresh air to push stale air out. If you have ceiling fans or exhaust fans rated for at least 100 CFM (cubic feet per minute), run them while grilling to speed up air removal.
These steps work because they replace contaminated air with fresh air continuously rather than letting CO accumulate.
Choosing Safer Grill Types
Electric and infrared grills produce negligible amounts of carbon monoxide since they burn nothing at all. If you already own a gas or charcoal grill, regular maintenance keeps it running cleanly. Check your burners monthly for clogs or uneven flames, and clean grates before each use to promote complete burning.
Never leave your grill unattended while it operates. Step away only after it cools completely, which takes roughly 30 to 45 minutes depending on grill size.
Best Grill Types for a Screened Porch

When choosing a grill for your screened porch, think about how different fuel types work in a confined space. Electric and infrared models are your safest options because they produce very little smoke and have no open flames. These features matter in an enclosed area where ventilation is limited.
Gas and charcoal grills present real challenges indoors. Both create significant smoke and require proper airflow to work safely. If you want to use these types, you’ll need to install ventilation systems—think range hoods or exhaust fans rated for outdoor cooking equipment. This work takes time and money, sometimes $500 to $2,000 depending on your porch setup.
Electric grills work by heating metal coils or plates that cook your food. They connect to a standard outlet, similar to how you’d plug in a toaster. Infrared models use radiant heat, which cooks food quickly and evenly without producing much smoke. Both options let you grill year-round without worrying about dangerous fumes building up inside your screened area.
If you’re set on gas or charcoal, consider keeping the grill just outside your porch opening. You can still enjoy grilled food while managing smoke and safety concerns properly.
Electric And Infrared Options
If you want a grill for your screened porch without open flames, electric and infrared models work well for this space. Electric grills produce zero flame, which makes them naturally safer in enclosed areas. Infrared grills use radiant heat to cook food quickly and create minimal smoke, so they don’t require as much ventilation.
When picking either type, look for a unit with a UL listing that says it’s safe for indoor or semi-enclosed spaces. Follow the manufacturer’s clearance guidelines exactly—these tell you how far the grill needs to be from walls, screens, and overhead structures. Place a grill mat or splatter guard underneath to protect screens and surfaces from grease damage. Standard grill mats measure about 36 by 48 inches and cost between 20 and 40 dollars.
Keep air moving around your porch by opening windows or running ceiling fans while you cook. This prevents heat from building up and keeps the space comfortable. These grills let you cook outside without worrying about safety concerns that come with open flames.
Gas Versus Charcoal Trade-Offs
While electric and infrared grills eliminate open flames entirely, many people still prefer the taste and cooking style that gas and charcoal provide—even on a screened porch.
Gas Grills: Lower Smoke, Easier Control
Gas grills work better in enclosed spaces because they produce less smoke than charcoal. You’ll need proper ventilation, and before each use, check your propane tank for leaks by applying soapy water to connections and looking for bubbles. Keep your propane tank upright and stable on a level surface.
Charcoal Grills: More Smoke and Embers
Charcoal grills create noticeably more smoke and dangerous embers that escape into the air. They require strong airflow and careful ash management. Place your charcoal grill on non-flammable mats and use the lid to contain embers when they start to spread.
Safety Setup for Both Types
Both gas and charcoal grills demand cross-ventilation through open panels or fans to push smoke outside. Keep flammables—like propane tanks, cushions, or wood—at least 10 feet away from your grill. Either way, you’re making a choice between the convenience of gas and the traditional flavor of charcoal while keeping safety as your top priority on your porch.
Electric and Infrared Grills: The Safest Indoor Options
Electric and infrared grills work well in screened-in porches because they handle the safety concerns that come with indoor cooking. Electric models produce zero open flame, which cuts down fire risk significantly. Infrared grills use radiant heat instead of burning fuel, so they create far less smoke than gas or charcoal options.
Both designs let you grill without the dangers traditional grills pose indoors. You’ll need proper ventilation though. Crack doors or windows partially open, or install a dedicated exhaust fan to keep air quality fresh while you cook.
Regular cleaning matters for safety. Grease buildup can ignite even on electric or infrared models, so wipe cooking surfaces weekly and empty drip trays after each use. Before you buy, check your porch’s electrical circuit. Most electric grills draw between 1,500 and 2,000 watts, so your outlet needs to handle that load without overloading the circuit. Match your grill’s power requirements to your outlet ratings to prevent electrical hazards and keep your cooking sessions running smoothly.
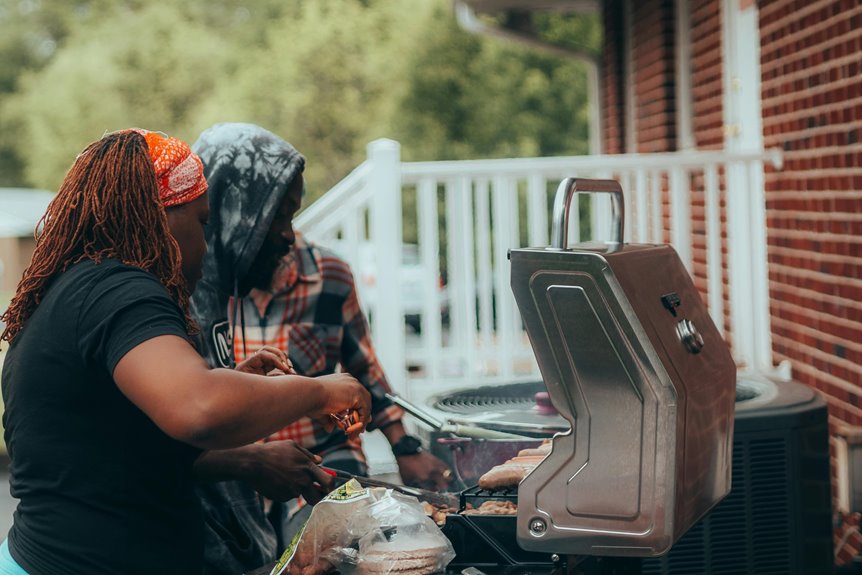
Gas Grill Safety in a Screened Porch
Gas grills need careful handling in screened porches because they release carbon monoxide during operation and require proper fuel management—issues that electric or infrared models avoid. Your main job is creating good airflow to prevent dangerous gas from building up around your family.
Start with the basics before you cook. Check all gas connections for leaks by applying soapy water to joints and looking for bubbles, which signal escaping gas. Make sure your propane tank stands upright on level ground and won’t tip over. Never operate a gas grill in a completely closed space. Instead, open screen panels or position a fan to pull fumes away from where people sit and move around.
Keep your grill at least 10 feet from screens, vinyl siding, and furniture. This distance protects these materials from fire damage and excessive heat. Store a fire extinguisher within a few steps of your grilling area—the five to ten pound variety works well for home use. Clean your burners monthly by checking for clogs and wiping them with a soft brush to keep flames burning evenly.
Gas grilling in a screened porch becomes a safe activity when you follow these straightforward steps.
Why Charcoal Grills Don’t Work in Screened Porches

Charcoal grills create two serious hazards inside a screened porch: smoke buildup and carbon monoxide accumulation. The screening that keeps insects out also traps harmful gases and smoke particles, degrading air quality within minutes of ignition.
Here’s what happens chemically. When charcoal burns, it produces carbon monoxide as a byproduct—a colorless, odorless gas that replaces oxygen in your bloodstream. A screened porch has limited airflow. The mesh blocks direct wind passage, and the enclosed walls prevent gases from dispersing into open air the way they would in a backyard setting. Within 10 to 20 minutes of starting your charcoal, carbon monoxide levels can reach unsafe concentrations in that confined space.
Smoke compounds the problem. Charcoal produces thick, visible smoke continuously throughout cooking, unlike gas grills that burn cleaner. This smoke contains particulates that irritate eyes, throat, and lungs. In an enclosed area, nowhere for that smoke to go means you’re breathing it directly while you cook and eat.
Gas and electric grills operate differently because they produce minimal smoke and no carbon monoxide. They’re designed for partial enclosure. Charcoal, however, requires true outdoor ventilation—a completely open environment or a structure with at least one fully open side to allow cross-airflow.
If you want to grill on a screened porch, use a propane or electric model instead. Both sit safely on a concrete pad, connect to simple power sources, and keep your porch air clean while you cook.
Excessive Smoke Production
Charcoal burns at higher temperatures than gas or electric heat sources, but it does so less efficiently. This means it releases much more smoke and fumes into the air around you. When you use a charcoal grill on a screened porch, visible smoke will linger in the space, creating discomfort and safety concerns for people nearby.
| Grill Type | Smoke Output | Ventilation Need |
|---|---|---|
| Charcoal | High | Extensive |
| Gas | Low | Moderate |
| Electric | Minimal | Basic |
The problem goes beyond what you see. Charcoal produces particulates and volatile compounds that accumulate quickly in semi-enclosed spaces. When charcoal flares up, these particles concentrate fast. Without strong cross-ventilation, you end up in a choking environment where smoke seeps into adjacent rooms and leaves odors that linger for days afterward.
Building codes actually restrict charcoal use in enclosed areas because the smoke concentration becomes a health hazard. You’ll find yourself constantly opening doors and windows to manage the air quality, which defeats the purpose of having a screened porch in the first place. The screened structure that was supposed to protect you from insects and weather becomes ineffective when you need to keep it open for ventilation.
Carbon Monoxide Hazards
Why Charcoal Grills Don’t Belong in Screened Porches
Charcoal grills produce carbon monoxide, a colorless, odorless gas. In enclosed spaces, it builds up quietly and makes people seriously ill. Your screened porch lacks the air movement needed to push this gas safely away.
Think of it this way: a screened porch has screens, not open walls. Air can slip through screens in gentle breezes, but not in steady, strong flows. Without a dedicated exhaust system or real cross-ventilation—like open doors or windows on opposite sides—carbon monoxide lingers where you breathe. Window fans help, but they don’t move enough air to keep you safe. A window fan moves air in one direction. What you need is continuous replacement of indoor air with fresh outdoor air.
Building codes and fire safety guidelines actually prohibit charcoal grilling in screened areas. These rules exist because people got sick or worse before anyone realized the danger.
If you want to grill on a porch, electric or infrared grills work better. These produce heat without producing carbon monoxide. Pair them with basic ventilation—like leaving a door or window partially open—and you can use your porch safely. The tradeoff is simple: you get to enjoy your space without a hidden threat.
Safe Clearance Distances in Your Screened Porch

Your grill needs proper breathing room to work safely. Keep at least 3 feet of space between your grill and any walls, screens, or furniture. This distance matters because it slows down heat from traveling toward things that could catch fire and stops dangerous flare-ups that might damage your porch structure.
Set your grill on a non-flammable surface—concrete pads or metal stands work well. Position it away from your roofline and soffit overhead, since these materials can ignite if exposed to radiant heat over time. Even if your porch has a screen, the overhead structures still need protection from below.
Keep a fire extinguisher within arm’s reach, but place it away from the grill’s immediate vicinity so you can grab it quickly if needed. A standard 10-pound extinguisher works for most residential setups.
Ventilation prevents smoke and heat from building up inside your screened space. Avoid fully enclosing your grill area. Instead, use screened panels or position a fan to move air across the porch and out through openings. Cross-ventilation reduces smoke buildup and lets heated air escape rather than collecting overhead where it can damage materials or make the space uncomfortable to use.
Where to Place Your Grill (And Where Not To)

Where to Place Your Grill (And Where Not To)
Placement is everything when you’re grilling in a screened porch. Think of it like arranging furniture in your living room—the spot you choose affects how well everything works and whether people stay comfortable and safe.
Smart grill placement protects your gathering space and keeps everyone safe.
Position your grill for fire safety:
- At least 10 feet from walls, screens, and furniture – This distance prevents heat damage and reduces fire risk significantly. If your porch is smaller, measure from your grill’s edge to the nearest combustible surface and aim for that 10-foot mark.
- Near a noncombustible wall shield – A metal backing protects your structure from intense heat. Think of it as a heat blocker between your grill and the wooden or vinyl parts of your porch.
- Away from soffits and vinyl panels – These materials can warp or ignite when exposed to high temperatures. Soffits are those horizontal pieces under the roof edge, and they’re particularly vulnerable.
- On a metal or heat-resistant mat – This protects your flooring from grease and heat damage over time. The mat also makes cleanup easier since grease won’t seep between porch boards.
Open your porch panels or use a ceiling fan to bring in fresh air. Keep your propane tank upright and secured in a nearby spot. These steps help you create a safer grilling space.
Carbon Monoxide Risk: Why Airflow Can’t Be Ignored
When you’re grilling in a screened porch with gas or charcoal, you’re creating an invisible danger that many people overlook. Carbon monoxide, a colorless and odorless gas, builds up silently in enclosed spaces. You won’t notice it until poisoning symptoms appear—headache, dizziness, nausea, confusion. Proper ventilation isn’t optional. It’s how you protect yourself and your guests.
Constant airflow dilutes carbon monoxide to safe levels. Think of it like this: when you cook on a regular stove indoors, your kitchen exhaust fan pulls fumes outside. A screened porch needs similar air movement. Without it, the gas pools in the space where you’re breathing.
How to Set Up Working Ventilation
Cross-ventilation works best for year-round grilling. Open windows or doors on opposite sides of your porch to create a direct path for air to flow through. If your porch has only one window, you’ll need to rely on fans or other methods. Ceiling fans help by keeping air moving, though they work best alongside open openings. A standard 42-inch ceiling fan circulates air in a 15-by-15-foot space reasonably well.
Never block vents with furniture, grills, or storage. Even a small obstruction stops the airflow pattern you’ve set up. Check your setup weekly by holding a lightweight piece of paper near openings—it should flutter gently, showing air is moving.
Safer Grill Options
Electric grills produce almost no carbon monoxide. Infrared models generate significantly less than traditional gas grills. If you use a gas or charcoal grill in a screened space, you must monitor airflow constantly. Don’t leave your grill running unattended, even for a few minutes. Plan your cooking so someone can watch both the food and ventilation the entire time.
The safest approach for screened porches: use electric or infrared grills with windows open or fans running during operation.
Setting Up Proper Ventilation and Airflow
You’ve learned why carbon monoxide is dangerous in enclosed spaces. Now you need to build a ventilation system that actually works. Good airflow keeps you and your family safe while grilling on a screened porch.
Create pathways for air movement. Open windows or panels on opposite sides of your screened area. This creates cross-breezes that push smoke toward the exit rather than letting it linger near where people are sitting. If your space doesn’t have opposite openings, you’ll need to rely on mechanical help.
Install active ventilation. Ceiling fans or exhaust systems pull smoke upward and out of the breathing zone. A standard ceiling fan moves air at 3,000 to 4,000 cubic feet per minute, which helps but works best when paired with open windows. An exhaust fan designed for outdoor kitchens can move 1,200 to 2,400 cubic feet per minute and removes smoke more effectively.
Choose your grill type carefully. Electric and propane grills produce fewer harmful fumes than charcoal. Charcoal releases more carbon monoxide and particulates into the air, making ventilation work much harder to keep your space safe.
Position your grill for clear airflow. Place the grill at least three feet away from screens, walls, and furniture. This distance gives smoke room to rise and move without hitting obstacles that would push it back toward seating areas. Measure this space before you buy or move your grill.
Keep your grilling area tidy. Use drip mats under the grill to catch grease and prevent flare-ups. Flare-ups create extra smoke that overwhelms ventilation systems. A clean grate and regular grill maintenance also reduce unexpected smoke production. These aren’t complicated steps—they’re straightforward safety practices that let you grill with confidence.
Grease Buildup: The Hidden Fire Hazard

While you’re focused on smoke and ventilation, grease accumulation quietly becomes your screened porch’s most dangerous fire risk. Grease ignites easily when embers or flare-ups occur, threatening everything nearby. You’ll prevent this through regular cleaning and smart catch systems.
| Prevention Method | Frequency | Purpose |
|---|---|---|
| Clean grates and burners | After each use | Minimize hard-to-remove grease |
| Use drip trays or mats | Every grilling session | Catch fat safely |
| Scrape deposits promptly | During cooking | Reduce dangerous buildup |
| Deep clean surfaces | Weekly | Remove accumulated residue |
The best defense starts during cooking, not after. Keep a metal scraper and stiff-bristled brush within arm’s reach of your grill. When you spot grease pooling on the grates or dripping onto the firebox, scrape it away immediately. This takes maybe two minutes but stops small flare-ups from becoming large ones.
For catching grease before it becomes a problem, place a disposable aluminum drip tray directly under your cooking grates. These trays cost around three to five dollars and hold about 32 ounces of grease safely. Replace or empty them after each grilling session so fat doesn’t sit and harden.
Once a week, do a deeper cleaning. Wipe down all interior surfaces with a damp cloth, then dry them completely. Pay special attention to corners where grease tends to pool. This weekly habit takes about fifteen minutes and removes the residue that builds up between regular cleanings.
Keep your fire extinguisher within five feet of your grill at all times. Accumulated grease burns hotter and spreads faster than you might expect, so quick access matters. Check that it’s fully charged at the start of each grilling season.
Regular Maintenance to Prevent Flare-Ups

Regular Maintenance to Prevent Flare-Ups
Flare-ups start small and spread quickly, so you need a simple maintenance routine before and after you grill. This takes just a few minutes each time, but it makes a real difference in keeping fires under control.
What to Do Each Time
Wipe down your grates and drip trays to remove grease buildup. Grease ignites easily, so this step matters. Check your burners, hoses, and all the connections where parts join together. Look for cracks, leaks, or parts that look worn out. Clear your vent lines of any grease that’s collected there, and make sure air can flow freely through all ventilation pathways.
Keep a 3-foot zone around your grill clear of anything that could catch fire—that means no paper towels, propane tanks, or wooden furniture sitting nearby.
Why This Matters
When you catch small problems early, before a flare-up happens, you stop fires from starting in the first place. Many people think grill safety is complicated, but it comes down to removing what burns and checking that everything is working right. Grease buildup is the main culprit behind most flare-ups, so paying attention to your grates and drip trays pays off every single time you grill.
Check Your Local Codes Before Setup
Before you set up your grill, check your local fire codes and building permits. Many areas restrict open-flame grilling in enclosed or semi-enclosed spaces like screened porches.
Your jurisdiction might require you to use an electric grill instead, install special ventilation systems, or maintain specific clearances from walls and combustible materials. These requirements vary by location, so you need to find out what applies where you live.
Contact your local fire marshal or a licensed contractor to confirm what setup is allowed in your area. This phone call takes about 10 to 15 minutes but prevents costly violations or safety problems later. When you call, have your address and a description of your porch or outdoor space ready so they can give you accurate guidance for your specific situation.
Local Fire Code Requirements
One of the biggest mistakes people make is assuming their screened porch is safe for grilling without checking local fire codes first. Your municipality has specific rules about where you can grill, and they’re not suggestions—they’re legal requirements that protect your home and family.
Before you set up your grill, you need to contact your local fire department or building inspector directly. They’ll answer these specific questions for your area:
What counts as enclosed or semi-enclosed. Fire codes classify spaces differently depending on how many walls and what type of roof they have. A screened porch might be treated one way, while a three-sided structure might be treated another way. Your inspector will tell you exactly how your space is classified.
Whether charcoal grilling is allowed indoors. Many jurisdictions prohibit charcoal grills in any covered space because they produce carbon monoxide. Gas grills sometimes have different rules than charcoal. You need to know what applies where you live.
What ventilation standards apply. If you’re allowed to grill under cover, your space probably needs a certain amount of airflow. This might mean open vents, a certain number of square feet of mesh screening, or other specific features. Your inspector will describe the exact measurements and materials required.
Whether you need permits, clearance distances, or fire extinguishers. Some areas require permits before you install a grill. Others require your grill to be a certain distance—often 10 feet—from your house. Some require a fire extinguisher rated for grease fires to be mounted nearby. Getting these answers now prevents costly fines or removal orders later.
Building Permit Considerations
After checking with your fire department about safety rules, you need to find out if your area requires a building permit for your grill setup.
Different jurisdictions have different rules. Some places treat grills as temporary equipment that doesn’t need a permit, while others require formal approval before you install one. Your local building or planning department will tell you exactly what paperwork you need to submit.
| Requirement | What You’ll Submit | Why It Matters |
|---|---|---|
| Ventilation plans | Drawings showing how air moves | Smoke needs a clear path away from your home |
| Fire safety measures | Where your extinguisher goes and how far the grill sits from walls | Keeps flames away from your house and nearby structures |
| Fuel type details | Information about propane, charcoal, or electric | Different fuels have different safety rules |
Call your city or county building department. Ask about three specific things: what ventilation standards they require, how far your grill needs to sit from walls (often 10 feet minimum), and whether you need non-combustible flooring underneath. Also check your homeowners association rules, since they may have their own restrictions. Getting approval before you build saves time and money down the road.
What Safety Gear You Actually Need

Several pieces of safety equipment will help keep your grilling safe and controlled.
You’re joining people who take grilling seriously and know that good preparation prevents problems. Here’s what you actually need:
- Fire extinguisher rated Class K or A-B-C mounted within arm’s reach of your grill
- Working smoke detector positioned 10 to 15 feet away for early warning
- Heat-resistant gloves with non-slip grip to handle hot surfaces safely
- Open windows or doors to create cross-ventilation and manage smoke
Wear long sleeves secured at the wrists. This simple step shields your skin from flare-ups and the radiant heat that rises from the grill. Your protective gear isn’t overdoing it. A fire extinguisher designed for grease fires stops small problems before they spread. Good air movement keeps smoke from building up indoors. Each item does its job, and together they create layers of protection that let you grill without constant worry.
How to Position Your Grill: A Step-By-Step Setup Guide
Before you fire up your grill, getting the placement right matters for keeping your screened porch safe and functional. Start by positioning your grill at least 10 feet away from walls, furniture, and anything flammable. This distance protects your space from heat damage and the sudden flare-ups that happen when grease ignites.
Keep the grill away from screen panels so air can flow freely around it and the mesh won’t get damaged from heat or grease splatter. If your grill sits near a porch wall, install a wall shield or fire-brick backing. These materials guard against both heat damage and the greasy stains that accumulate over time.
Proper ventilation keeps smoke from building up inside your porch. Open doors and windows to create cross-flow airflow, which means air enters from one side and exits from another. If natural airflow seems weak, run a fan to disperse smoke throughout the space more effectively. This simple step makes the difference between a comfortable grilling experience and one where you’re squinting through smoke.