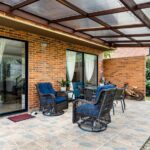
A Three Season Porch Sits Between Your Deck and a Fully Enclosed Room
Using screens and windows, you’ll block bugs and weather while keeping light and views intact. This setup lets you enjoy spring, summer, and fall without paying for year-round heating costs.
Start With Your Site Assessment
Before planning anything, spend time observing your space. Notice where the sun hits throughout the day and how wind moves across your property. Watch for afternoon shade patterns in summer and consider which direction your porch will face. These patterns affect both comfort and how much you’ll use the space.
Plan Your Layout Around Movement
Your doorways and traffic flow matter more than you might think. Where do people naturally walk when moving between your house and yard. Position your seating and main gathering areas away from these paths so foot traffic doesn’t interrupt conversation or relaxation. Leave at least 3 feet of clear walkway space for comfortable movement.
Choose Materials Built to Last
Slate tile and sealed concrete both handle weather well without requiring constant maintenance. Slate costs around $8–$15 per square foot but lasts decades. Sealed concrete runs $3–$8 per square foot and needs resealing every 2–3 years. For a 120-square-foot porch, budget $960–$1,800 for slate or $360–$960 for concrete.
Extend Your Season With Weatherstripping
Adding weatherstripping to your windows and doors lets you use the porch into October and November. Rubber or foam strips cost $15–$40 per door and take about 20 minutes to install. This simple step keeps wind and cold out while preserving the open-air feeling you want.
Budget Realistically for Your Project
A basic three-season porch runs $1,000–$3,000 depending on size and what you add. Smaller porches under 100 square feet might cost $1,000–$1,500, while larger ones at 200 square feet could reach $3,000–$4,000. Factor in screening ($2–$5 per square foot), window installation ($200–$500 per window), and materials before you finalize your plans.
Handle Permits and Heating
Check local building codes before construction starts—most areas require permits for three-season porches. Your township office can tell you specific requirements in 1–2 days. If you want to add heat for late-season use, consider a small electric heater ($100–$300) or radiant floor heating ($1,500–$3,000 installed).
Use Smart Lighting Choices
Ceiling fans with integrated lights work well for three-season spaces, providing both air circulation and brightness. Wall-mounted sconces ($40–$100 each) add ambiance without overwhelming the space. Install dimmers so you can adjust light levels as the sun changes throughout the day.
What Is a Three-Season Porch (and Why It Matters)
What Is a Three-Season Porch (and Why It Matters)
A three-season porch sits between a regular deck and a fully enclosed room. It uses screens or windows to keep out bugs and bad weather while letting you enjoy spring, summer, and fall comfortably. Think of it as a middle ground—you get protection from the elements without building a room you can use year-round.
What makes this design work is how it handles light and views. Screens and windows let natural light pour in while protecting you from wind, rain, and insects. You also skip the expensive heating and cooling systems that four-season rooms require. This means lower costs and faster construction. Most three-season porches take 4 to 8 weeks to build, depending on size and materials.
The payoff includes extra living space for hosting, reading, or quiet time. A typical three-season porch might measure 12 by 16 feet, adding roughly 190 square feet to your home. The main limitation is winter—cold temperatures make the space uncomfortable without upgrades like insulation or a heating system. For many homeowners, this trade-off works well. You gain comfort and extra room without the investment of a full year-round addition.
Three-Season vs. Screened Porches: Key Differences
What Sets Them Apart
The main difference comes down to how much weather protection you get. A screened porch uses mesh screens to keep bugs out while letting air flow freely. Think of it as a barrier that blocks insects but stays open to the breeze. A three-season porch, on the other hand, has solid walls and windows you can open or close depending on the weather.
How They Handle Different Seasons
Screened porches work best during warm months when you want fresh air and bug protection. They don’t offer much help when rain or wind picks up. Three-season porches handle spring rain, fall winds, and cool temperatures much better. They include insulation in the walls and often have heating options, which means you can use them from late spring through early fall—sometimes even into early winter depending on your climate zone.
Three-season porches excel in cooler months with insulation and heating, extending usability from spring through early winter.
The difference is like comparing a summer patio to a room that feels almost like part of your house. A screened porch stays mostly open to outdoor conditions. A three-season porch creates a more sheltered environment while still giving you outdoor views and natural light.
Choosing Between Them
Pick a screened porch if you want simple construction, lower costs, and maximum airflow during warm weather. Go with a three-season porch when you need to use the space through cooler months and want real weather protection. Neither type includes air conditioning or full heating systems like a four-season room would, so expect temperature limits in both cases.
Is a Three-Season Porch Right for Your Home?

Before you commit to building a three-season porch, take time to honestly assess how your family will use the space and whether your climate can support it.
Climate compatibility: Your region needs to have mild springs, summers, and falls. If you live somewhere with temperatures dropping below 32°F for months at a time, a three-season porch becomes expensive to heat and less practical.
Budget readiness: Quality matters here. You’ll need double-pane windows (typically $300–600 per window) and proper insulation in walls and ceilings. Cheap materials fail quickly in temperature swings.
Lifestyle fit: Be honest about daily habits. Will your family actually spend time there, or will it become storage space. If you have young children, they might use it for play during mild months. If you work long hours indoors, you may not see it much.
Energy efficiency: Heating a three-season space during spring and fall costs money. Budget for higher utility bills during those months, especially if you live in a climate where temperatures dip into the 40s.
Maintenance commitment: Seasonal upkeep takes effort. You’ll need to clean windows, check weatherstripping twice yearly, and possibly remove screens and install storm panels depending on your region.
A three-season porch works best when you genuinely enjoy moving between indoors and outdoors. If your area experiences extreme winters or your family rarely goes outside, the investment won’t pay off. But if you value watching spring rain or enjoying crisp fall mornings—spending real time in that transition space—this addition does extend your usable square footage and supports the lifestyle you want.
Site Assessment: Light, Shade, and Wind Patterns

Your porch’s location on your property will determine how much you actually use it. Before you build, spend time observing light, shade, and wind patterns across different seasons. These observations will guide better decisions about placement and design.
Tracking Sunlight Throughout the Year
Watch how sunlight moves across your potential porch location from spring through fall. Notice where shadows land at different times of day. South-facing porches receive more direct heat, making them warmer in cooler months but potentially too hot in summer. North-facing locations stay cooler and more shaded. East-facing spots catch morning light, which many people enjoy for breakfast or coffee. West-facing areas get intense afternoon sun that can make the space uncomfortable without shade coverage.
The table below shows what to expect seasonally:
| Season | Morning Light | Afternoon Shade | Wind Exposure |
|---|---|---|---|
| Spring | Energizing | Moderate | Variable |
| Summer | Intense | Essential | Cooling |
| Fall | Balanced | Welcomed | Increasing |
Start your observations in early spring and continue through late fall. This gives you a full picture of how conditions change. In spring, morning light feels pleasant but afternoon shade is helpful. Summer brings intense sun that makes afternoon shade necessary for comfort. By fall, balanced light returns and some wind exposure becomes welcome as temperatures drop.
Understanding Wind Patterns
Observe how wind behaves on your property by watching trees bend and leaves scatter. Note whether the area feels drafty or protected. Sheltered corners tend to feel more inviting because they reduce constant wind without blocking all air movement. Position your porch where natural windbreaks—existing trees, shrubs, or nearby structures—reduce strong gusts while still allowing gentle breezes. This creates a space that feels comfortable rather than exposed or stuffy.
What to Budget for Your Project?

Building a three-season porch requires planning across several major cost categories. The total investment typically falls between $8,000 and $25,000, though your specific choices will determine where your project lands within that range.
Breaking Down Your Costs
Foundation and framing form the structural backbone of your porch. This work establishes how well your space will hold up over time and typically represents a significant portion of your budget.
Windows and doors create the weather barrier that makes a three-season space usable. Quality enclosures protect against rain, wind, and insects while allowing natural light inside. These components alone can account for 20 to 30 percent of total costs.
Materials matter for longevity. Weather-resistant options like vinyl siding, composite decking, or treated lumber cost more upfront but require less maintenance. Standard materials might save you money initially, but they may need replacement sooner.
Heating and cooling systems extend your porch’s usable months. Baseboard heaters work well for mild climates, while portable heat units offer flexibility if your space is smaller. This addition typically costs $1,000 to $3,000.
Labor and permits complete the picture. Professional installation ensures proper building codes compliance. Local permit fees vary by region but generally range from $200 to $800.
Factors That Affect Your Final Price
Your porch design, climate zone, and choice of heating or cooling solutions all shift your total investment. A basic three-by-ten-foot structure costs less than a twelve-by-sixteen-foot design with advanced insulation. Cold climates require better heating options. Consult with local design-build professionals who understand your area’s building codes and typical material costs. They can help you allocate your budget effectively and avoid unexpected expenses.
Do You Need Permits? Local Requirements Explained

Before you start building, understand that your local building codes and zoning rules vary depending on where you live. Your city or county likely requires permits for structural changes, new roofing, or additions that expand your home’s footprint.
Start by contacting your local building department. A staff member can tell you exactly what applies to your project, or you can work with a contractor who handles this regularly. Many contractors know the local requirements well and can guide you through the process.
The permit application process typically involves three steps. First, you’ll submit detailed plans for review—these show what you’re building and how it will look. Second, the building department reviews your plans and approves the structural design. Third, you’ll confirm that your porch meets local setback requirements (the distance from your property line) and fire safety standards.
This process takes time. Plan for 2 to 4 weeks from application to approval, though some municipalities take longer during busy seasons. Have your architect or contractor prepare scaled drawings showing dimensions, materials, and how the addition connects to your existing structure. The building department will specify exactly what drawings they need.
Getting permits upfront prevents problems later. Building without permits can result in fines, difficulty selling your home, or requirements to tear down unpermitted work. It’s far simpler to get approval before you build.
Building Codes and Zoning
Before you start building your three-season porch, you need to contact your local building department. Most jurisdictions require permits for this type of project. Your local codes and zoning ordinances exist for good reasons—they keep homes safe and neighborhoods consistent.
Building codes cover specific structural elements. These include how your porch connects to your home’s existing frame, ventilation and weatherproofing details, insulation thickness for energy efficiency, setback distances from your property lines, and height limits based on your zone. Different locations have different rules. Your zoning laws might specify exactly where you can place your porch and set a maximum size—perhaps requiring your porch to sit at least 10 feet from a property line or limiting it to 15 feet in height.
Skipping the permit process creates real problems. You could face fines ranging from a few hundred to several thousand dollars, be required to remove the structure entirely, or find your homeowners insurance won’t cover damage because the work wasn’t permitted. A licensed design-build team knows these requirements inside and out. They handle permit applications, schedule inspections at the right stages of construction, and keep your project on track. Most permits take two to four weeks to obtain, though this varies by location.
Permit Application Process
Do You Need a Permits for Your Three-Season Porch?
Yes, in most places you do. Your local building department requires permits for structural framing, roofing, and window installations. If you’re adding electrical work like lighting or outlets, that also needs approval.
What the Process Involves
The permit process has multiple stages. You’ll go through pre-construction review, framing inspection, insulation inspection, and a final walkthrough. Each one checks that your work meets local building codes. A licensed design-build team knows your area’s specific zoning rules and can move things along faster because they’ve done this before.
Why Skipping Permits Backfires
Not getting permits sounds like a time-saver, but it creates real problems. You could face fines, have to remove the work you just finished, or lose your homeowner’s insurance coverage if something goes wrong. One homeowner I knew added a porch without permits and had to tear it down when the city found out—that cost them thousands more than the permit would have.
Getting Started
Call your building department early. They’ll tell you exactly what permits you need, how long the process takes (usually 4 to 8 weeks from start to finish), and which inspections apply to your project. Starting now prevents expensive mistakes down the road.
Choose Your Window and Ventilation System

When you’re building your three-season porch, the windows and ventilation you choose will affect how comfortable you’ll be during spring, summer, and fall. Think of these two systems as partners—they work together to keep your space usable across different weather conditions.
You have three main window options to consider. Standard screens let air flow freely but offer little weather protection. Retractable windows slide out of the way when you want open air, then seal tight when rain or cold arrives. Glass panels provide the most insulation and weather protection, though they cost more upfront—typically $150 to $400 per panel depending on size and quality.
Your climate matters here. If you live somewhere with mild winters and occasional rain, screens might work fine. In areas with stronger weather swings, retractable windows give you flexibility without the cost of full glass enclosure. Glass panels make sense if you want to use your porch well into late fall or early spring.
Ventilation keeps moisture from building up and prevents that trapped, stuffy feeling. Ceiling fans work year-round—they move air during warm months and can reverse direction in cooler weather to push warm air down from the ceiling. Operable windows, meaning ones you can open and close, let you control airflow directly. Install at least two windows on opposite sides of your porch so air can move through, not just stall in corners.
The combination of good window choice and proper air movement determines whether your porch feels inviting or uncomfortable over time.
Window Material and Durability
Your window choice affects how comfortable you’ll actually be on your three-season porch. The right windows let you use the space during spring, fall, and sometimes winter. Poor windows mean you’ll close up the porch when temperatures drop.
What Makes Windows Last
Pick materials that handle Minnesota’s temperature swings without warping or cracking. Vinyl and fiberglass frames stay stable when temperatures shift from 90 degrees in summer to 20 degrees below zero in winter. Wood frames need regular maintenance and can rot when exposed to moisture.
Key Window Features to Consider
Multi-pane glazing: Double-pane or triple-pane windows trap more heat than single-pane glass. The air gap between panes acts as insulation. Triple-pane windows perform better in extreme cold but cost more upfront.
Vinyl frames: These need only occasional cleaning with soap and water. They won’t rot, splinter, or need repainting like wood frames do.
Operable windows: Windows that open and close let you control airflow on mild spring and fall days. This ventilation keeps your porch from getting stuffy.
Quality seals: Tight weatherstripping and caulking around the frame stops cold air from leaking in. Gaps around old windows can reduce comfort noticeably.
UV-protective coatings: Reflective coatings on the glass block harmful sun rays that fade furniture, rugs, and other fabrics inside.
How Better Windows Extend Your Season
Good window insulation can add one or two extra months to your porch’s usable season. A porch with standard single-pane windows might feel comfortable only from June through August. That same porch with triple-pane, well-sealed windows can stay pleasant from April through November. This longer usable period adds real value to your home and gives you more time for gatherings and relaxation.
Ventilation Options for Climate
Ventilation Options for Minnesota’s Three-Season Porch
Minnesota’s weather shifts dramatically from season to season, so your three-season porch needs ventilation that goes beyond what a standard bedroom window can handle. You’ll want flexible airflow solutions that adjust as conditions change throughout the year.
Operable windows give you direct control over fresh air during spring and fall when temperatures stay mild. Ceiling fans work well in summer to move stagnant air around without running an air conditioner. Multi-panel fold-away glass doors let you open up the space on pleasant days and close it off when you need separation from the outdoors.
Humidity management matters during Minnesota’s humid summers. A dehumidifier removes excess moisture from the air, keeping the space comfortable. Some people install EZE Breeze enclosures, which are partially open panel systems that allow airflow while controlling moisture buildup.
| Ventilation Type | Best Season | Key Benefit |
|---|---|---|
| Operable Windows | Spring/Fall | Natural airflow control |
| Ceiling Fans | Summer | Heat circulation |
| Fold-Away Doors | Mild Days | Flexible indoor-outdoor connection |
| Dehumidifiers | Summer | Humidity management |
| Sealed Systems | Winter | Heat retention |
When winter arrives, proper sealing becomes your priority. Good weatherstripping around windows and doors prevents warm air from escaping while keeping cold drafts out. This doesn’t mean you can never open anything—you can still crack a window briefly if needed—but the goal is holding onto the heat you’ve paid for.
Plan Your Layout Before Selecting Flooring

Before you pick out a single tile or board for your three-season porch, sketch out how you’re actually going to use the space. Think about your daily routines and seasonal shifts.
Start by mapping doorways and windows to understand where people naturally walk. This traffic flow matters because high-traffic zones need stronger, more durable materials. Next, identify seating zones that catch spring and summer breezes—these areas might get less foot traffic and can handle softer finishes. Designate a dining area away from main pathways so spills and crumbs don’t create problems in busy zones. Plan spaces for rainy fall days, whether that’s a work corner or play area. Note existing structural elements like beams and ceiling height, since these affect how you’ll arrange everything.
Your layout determines everything about flooring success. When you understand how people move through your porch, you’ll select materials and directions that withstand foot traffic while supporting your lifestyle. A porch that gets steady use might need 3/4-inch-thick hardwood or ceramic tile rated for exterior use, while a sheltered seating nook could work with thinner materials. This planning foundation makes choosing durable tile or weathered wood straightforward and purposeful.
Durable Flooring Choices for High-Traffic Areas

When you map out where people actually walk through your three-season porch, you’ll notice certain zones get heavy foot traffic—entryways, pathways to seating areas, routes to the kitchen. Slate flooring works well in these spots.
Unlike carpet, slate handles constant use without wearing down. It performs especially well in Minnesota’s shifting temperatures and frequent transitions between indoors and outdoors. The natural texture provides slip resistance, which keeps your family safe year-round.
Choose slate in a planned pattern to add visual interest while keeping durability as your main goal. For underfoot comfort, layer area rugs or runners across high-traffic zones. A 3-by-5-foot runner in your entryway or a 2-by-8-foot runner along a pathway combines practicality with comfort without covering the slate completely.
Time your flooring installation after your main interior work finishes. This scheduling approach lets you continue using your porch during renovation while the slate gets properly laid down. Most slate installations take 5 to 7 days for a medium-sized porch, depending on pattern complexity and subfloor preparation.
Heat Your Three-Season Porch Year-Round

Your three-season porch can stay comfortable through Minnesota winters with the right heating approach. Baseboard heaters, wall-mounted units, radiant ceiling panels, and gas fireplaces each work differently, so understanding your options helps you pick what fits your space and budget.
Heating alone won’t keep your porch warm enough. You need to seal gaps and add insulation so heat stays inside rather than escaping through walls and around doors. Start by checking where cold air enters. Run your hand along the door frame on a windy day—you’ll feel drafts at gaps. Apply weatherstripping tape around door edges, which costs about $10 to $20 per door and takes 15 minutes to install.
Next, address your walls. If your porch has exposed cavities, spray foam insulation fills gaps effectively. A standard 12-ounce can runs $5 to $8 and covers roughly 30 linear feet of gaps. For existing walls without cavities you can access, consider blown-in cellulose or fiberglass insulation, though this requires hiring professionals and typically costs $1,500 to $3,000 for a medium-sized porch.
Don’t forget your ceiling. Install a ceiling fan to push warm air downward, where you actually sit. This simple step costs between $100 and $300 and takes a few hours. Run it on low speed in winter—you want circulation, not strong wind.
Combine these steps in sequence. Seal doors first, then insulate walls, then add a fan and your chosen heater. This layered approach prevents wasted heating and extends your porch’s usable season from October through March.
Heating Options for Porches
Since three-season porches sit between your home’s interior and the outdoor elements, you’ll need reliable heating if you want to use them during fall and winter months. Several solid options work well for this purpose.
Baseboard heaters are straightforward to install. Two 72-inch units placed on opposite sides of your porch with independent thermostats deliver even warmth across the space.
Mini-splits are ductless systems that heat efficiently without requiring extensive installation work. They operate quietly and let you control temperature in your porch separately from the rest of your home.
Gas fireplaces provide both warmth and a focal point that makes the space feel inviting. Installation does require venting considerations, so plan for that when evaluating this option.
Portable electric heaters offer flexibility since you can move them around as needed. They’re budget-friendly and don’t require permanent installation.
Radiant heat panels distribute warmth evenly across your ceiling or walls, which means no cold spots in corners or along edges.
Good insulation and sealing are equally important as your heating choice. Air leaks around doors, windows, and seams let warm air escape. Seal these gaps carefully, then add weatherstripping where needed. A ceiling fan helps circulate warm air downward, and operable windows prevent humidity buildup during milder days. When you combine heating with these steps, your porch becomes genuinely usable throughout the cooler months.
Making Year-Round Use Possible
Your porch doesn’t have to sit empty when cold weather arrives. By adding heat and improving insulation, you can use your three-season space throughout the year.
Heating Options for Your Porch
| Heating Option | Cost Range | Best For |
|---|---|---|
| Baseboard heater | $300–$800 | Small porches |
| Radiant panels | $1,500–$3,000 | Even warmth |
| Gas fireplace | $2,000–$5,000 | Ambiance + heat |
Getting Started
Start by sealing air leaks around doors and windows. Apply weatherstripping to door frames and window edges, then caulk any visible cracks in the walls or trim. This step costs between $50–$150 in materials and prevents heated air from escaping.
Next, install your chosen heater. A baseboard heater works well for smaller porches under 150 square feet. Radiant panel systems distribute heat evenly across the space and work better for larger areas. If you want both warmth and a focal point, a gas fireplace provides ambiance along with heat output.
Choosing What Works for You
Your climate determines which system makes sense. In mild winter areas where temperatures stay above 40 degrees Fahrenheit, a portable space heater may be sufficient. In colder regions with temperatures dropping below 20 degrees, radiant systems or gas fireplaces handle the workload more effectively. Consider your local heating season length and average winter temperatures when deciding your budget.
Start with weatherproofing and a basic heating option. After using your porch through one season, you’ll understand what your family needs and can add more features later.
Heating Options and Associated Costs

When you’re ready to extend your three-season porch into the cooler months, heating becomes your primary consideration. Understanding your options before installation helps you make a choice that fits both your space and your budget.
Baseboard heaters cost less upfront—typically $100 to $300 per unit—but they warm rooms unevenly. Heat rises from the floor, leaving upper areas cooler than you might want. They work well if you use the porch occasionally on weekends or for short periods.
Space heaters offer portable, affordable flexibility. You can move a 750-watt or 1500-watt unit from room to room, and they cost between $25 and $75. They heat quickly but use more electricity when running constantly, which adds to your monthly bills.
Radiant panels mount on walls or ceilings and distribute heat evenly across surfaces. They cost $300 to $600 per panel and take about an hour to install. Because they warm objects rather than just air, the room feels comfortable at slightly lower temperatures.
Gas fireplaces deliver consistent warmth and create ambiance. Installation costs run $2,000 to $5,000 depending on venting requirements. They work well in spaces where you’ll spend several hours at a time.
Mini-split systems have higher upfront costs—$3,000 to $8,000 installed—but operate efficiently over many years. They cool in summer and heat in winter, making them practical if you plan year-round use.
Pairing your heating system with proper insulation and air sealing maximizes efficiency. Weather-strip doors, caulk gaps around windows, and add foam board or fiberglass batts to walls if possible. Most homeowners find that baseboard heaters work well for occasional use, while mini-split systems suit frequent occupancy. Your climate zone, how often you use the space, and your available budget determine which option fits your lifestyle best.
Wiring and Lighting: Plan Before You Build

How you’ll use your three-season porch after sunset shapes your entire electrical plan. This is why mapping everything out before the walls go up matters so much. You’ll need outlets, switches, and lighting layouts that work well with your structure.
Start by thinking about layered lighting. Combine ceiling fixtures, wall sconces, and decorative lamps to extend how long you can use the space. This approach also lets you adjust the mood and handle different tasks.
| Lighting Type | Purpose | Placement | Notes |
|---|---|---|---|
| Ceiling fixtures | Task lighting | Center areas | Pair with dimmers |
| Wall sconces | Ambient warmth | Entry points | Align with beams |
| Pendant lights | Dining focus | Above tables | Plan wiring early |
| Decorative lamps | Mood setting | Corners/shelves | Requires outlets |
Position ceiling fan wiring and pendant lights along your structural beams. Running wires along beams from the start prevents difficult rewiring later. Check that your electrical capacity meets local codes and that everything is weatherproofed properly. This matters especially if you’re adding radiant heating panels so you can use the porch year-round.
Plan your outlet locations before framing begins. A typical three-season porch 12 feet by 14 feet needs at least 8 to 10 outlets spaced around the perimeter, roughly every 6 feet. Install switches at entry points so you can control lights when you first walk in. Consider adding dimmers to your ceiling fixtures. Dimmers let you adjust brightness from full light for tasks like reading or games down to soft background lighting for relaxing evenings.
Run all wiring through walls and beams during construction, not after. Once drywall and siding go up, adding new circuits becomes expensive and time-consuming. Work with a licensed electrician to run circuits to each area before closing up walls.
Pick Materials That Look Good and Last

Select materials built to withstand Minnesota winters. Freeze-thaw cycles and heavy foot traffic will break down weak materials quickly, so you need options that hold up.
Slate tile floors are a solid choice. They resist moisture and staining, which means less cleanup when snow melts on your floors or someone tracks in dirt. The stone stays stable through temperature swings that crack cheaper materials. A typical slate tile costs between $5 and $15 per square foot installed, depending on thickness and finish.
Weather-resistant alternatives work well too. Sealed concrete, composite decking, or engineered wood keep maintenance simple across all four seasons. You won’t spend your weekends refinishing surfaces or scrubbing off salt damage.
Your furniture matters as much as your floors. Pick sturdy pieces built from solid wood or high-quality metal frames that won’t warp when humidity changes or fade under direct sunlight. Cheap particleboard softens when wet and bends out of shape. Solid construction pieces last 10 to 15 years with basic care, while low-quality furniture often needs replacement within 3 to 5 years.
Think about how people use your space. High-traffic areas need tougher finishes. Entryways should have sealed or protected surfaces since that’s where wet boots and coats create the most wear. Less-traveled spots can handle lighter-duty materials.
Test materials before committing to large purchases. Ask suppliers for sample pieces you can install temporarily or observe in a similar climate for at least two weeks. You’ll see how they handle moisture and temperature changes before spending money on your whole project.
Durability For Minnesota Winters
Minnesota winters bring brutal cold, freeze-thaw cycles, and intense UV exposure. Your three-season porch needs materials that won’t crack, fade, or fail when temperatures plummet.
Materials That Stand Up to Cold
Fiber cement siding resists peeling and handles extreme temperature swings without splitting. When you’re choosing windows, look for those rated specifically for cold climates. They stay flexible even at 20 below zero, while cheaper vinyl becomes brittle and breaks easily.
Double or triple-pane glazing keeps condensation from building up on the inside. This matters because water that freezes and thaws repeatedly can damage your framing. Outdoor-rated cushions and furniture made with cold-resistant materials won’t crack when you leave them out through winter.
Paint designed for freeze-thaw cycles actually works differently than regular exterior paint. These formulas expand and contract with temperature changes instead of splitting open like standard paint does. A fresh coat every three to four years keeps your porch looking weathered but solid.
Structural Protection
Thermal breaks in your framing—those strips of insulation between the indoor and outdoor frame pieces—reduce heat loss significantly. Quality door and window seals block drafts that sneak in around edges. Check seals every autumn before winter hits hard. If you can see daylight around a closed door or feel cold air coming through, it’s time to replace the weatherstripping.
These investments protect both your porch’s structure and your comfort for years ahead.
Weather-Resistant Flooring Options
Your porch’s floor takes more wear than any other surface in your home. Wet boots, temperature changes, sun exposure, and constant foot traffic all work against it. You need flooring that handles Minnesota’s weather without deteriorating.
Slate tile is a reliable choice. The 1224 format gives you distinctive patterns while resisting moisture and fading. Porcelain tile works well too, since it’s engineered to handle outdoor conditions. High-performance vinyl planks made for exterior use offer durability with simpler installation than tile requires.
When selecting your material, consider a pattern that spreads wear across the entire porch surface rather than concentrating it in high-traffic zones. This approach extends how long your floor lasts. You might install slate now and save other flooring projects for spring when weather is more cooperative. Your flooring choice becomes the base for years of reliable porch use.
Low-Maintenance Furniture Choices
Once you’ve picked your flooring, choosing the right furniture matters. Good furniture lets you spend time relaxing instead of fixing things up all the time. Since Minnesota’s weather shifts between hot summers and freezing winters, you’ll want pieces built to handle these changes without needing constant work.
Look for these durable materials:
- Teak wood, resin wicker, or powder-coated aluminum frames that won’t rust or break down from rain and sun
- Outdoor cushions filled with quick-dry foam and all-weather fabric that resists moisture and mildew
- Modular seating with removable covers you can throw in the washer for easy cleaning
- Light-colored textiles with UV protection that hide dirt and bounce heat away instead of absorbing it
- Metal finishes treated to resist rust, even with humidity and temperature changes
When you pick materials that stand up to weather, you spend less time scrubbing and more time sitting outside. A porch furniture investment that lasts several seasons without major repairs means less headache and more time to enjoy what you’ve built.
How Long Does a Three-Season Porch Take to Build?

How Long Does a Three-Season Porch Take to Build?
The time needed to build a three-season porch depends on your starting point and how detailed your design is. A basic project runs four to eight weeks from beginning to end. If you’re screening in an existing deck, expect the shorter timeline. A full enclosed addition with new foundations and structural support takes twelve weeks or longer.
The length of your project matters for planning purposes. You want to finish before weather turns cold if you’re hoping to use the space that season. Several factors can shift your timeline: permit approvals from your local building department, weather delays, and how quickly your materials arrive. Experienced contractors know these variables well and build realistic schedules around them.