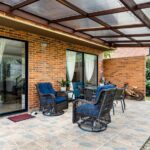
You can build a year-round outdoor space without paying contractors by selecting the right DIY porch kit for your needs. Start with aluminum patio covers featuring slide panels. These panels adjust to control sunlight throughout the seasons, giving you shade when you need it and open sky when you want it. They come in multiple widths and depths, typically ranging from 8 to 16 feet wide, so measure your porch first.
Modular screen kits like Screeneze offer straightforward bug protection. You snap panels together and secure them to your existing structure. The installation usually takes a weekend for a standard 10-by-12-foot space. These kits work on decks or patios that already exist, so no foundation work is needed.
Hard-top sunrooms with insulated panels represent a bigger commitment. Assembly typically spans two to three weekends depending on the size. The panels come pre-cut and labeled, with brackets and fasteners included. You’ll need basic tools like a drill and wrench. The insulated construction keeps heat in during winter and reduces air conditioning costs during summer by blocking direct sun.
Window awnings serve a single purpose efficiently. Mount them above windows on the south and west sides where sun exposure is strongest. They reduce indoor temperatures by 5 to 10 degrees on hot days, lowering your cooling costs over time.
Each kit comes in various colors and sizes to match your home’s appearance. Your choice depends on what you actually need. If insects bother you, screening is the answer. If temperature control matters most, consider the insulated hard-top option. If flexible seasonal control appeals to you, the slide panel covers work well.
Aluminum Patio Covers for Year-Round Shade

An aluminum patio cover kit gives you a practical way to use your outdoor space in any weather. You can enjoy your deck during hot summers, rainy springs, and cold winters without worrying about sun damage or water pooling on furniture.
An aluminum patio cover kit lets you enjoy your outdoor space year-round, protecting against sun damage and weather without constant furniture rearrangement.
These DIY porch kits use aluminum that has been tested in different weather conditions and lasts for many years. The frame pieces come in standard sizes, but you can arrange them to fit your exact patio dimensions. When the kit arrives, you measure your space and make any final cuts on-site so everything fits just right.
The installation process takes three straightforward steps and doesn’t require hiring a contractor. You start by getting a free quote with no high-pressure sales tactics involved. After you decide to move forward, the actual setup typically takes a weekend or two, depending on your patio size and how much outdoor space you need to cover.
Once your cover is up, your patio becomes a usable area year-round. In summer, the aluminum slats block direct sunlight while allowing air to flow through. During spring showers or winter snow, the solid panels above keep your deck dry and safe. This means you can set up outdoor seating, a dining table, or other furniture without constantly moving things inside when weather changes.
Aluminum patio covers work well for homeowners who want protection from the elements without the cost and complexity of a full roof addition. The materials resist rust and don’t require regular painting or staining like wood alternatives do.
Modular Screen Kits: Bug-Free Without Building

While aluminum covers keep rain and snow off your furniture, insects often become a problem during warm months. Screeneze DIY screen-in kits solve this without requiring construction skills or professional installation.
These modular kits use aluminum bases with removable vinyl caps available in bronze, sand, white, or clay. You’ll cut the bases to fit your perimeter and join them end-to-end for longer distances. The frame-on-deck design prevents roof collapse while blocking bugs completely.
Installation follows straightforward steps. Measure your perimeter first, then determine how many bases you need. Assemble the pieces using self-tapping screws, and the Phifer BetterVue screen material delivers both clarity and long-lasting durability. You get unobstructed views, normal sunlight passes through, and pets stay contained inside.
When weather shifts, you can remove everything in about ten minutes. This flexibility means you’re not committed to permanent screening. The whole process takes a weekend for most patios or decks, depending on your perimeter size.
Hard-Top Sunrooms: Custom Design, DIY Installation

Adding a Permanent Room to Your Home Without Contractors
You can add a fully enclosed room to your home by installing a hard-top sunroom yourself. This approach takes weekends instead of months, and you skip the labor costs of hiring contractors. The room works year-round because the insulated panels block weather while letting daylight through.
What Makes Hard-Top Sunrooms Different
Unlike screened porches that only keep out bugs, hard-top sunrooms have solid walls and roofs. You build them using aluminum framing paired with insulated panels. The aluminum doesn’t rust, and the panels keep heat in during winter and block excess heat in summer. Screened areas let weather through—rain, wind, and temperature changes. A hard-top room doesn’t.
Hard-top sunrooms feature solid walls and insulated panels that block weather, unlike screened porches that only keep out bugs.
Building With a Modular Design
The modular approach means you measure your deck or patio and order panels that fit your specific dimensions. Rather than custom-building everything at a factory, you receive pre-made sections you assemble on-site. You’ll cut some final pieces to match your exact space, then put walls together one section at a time.
This method lets you work at your own pace. You might finish a basic frame one weekend, add insulated panels the next, and complete finishing details over several weekends. Most homeowners complete projects within three to six weeks working part-time.
What You’ll Need to Know
Start by measuring your deck length and width in feet. If your deck is 12 feet by 14 feet, you’ll order panels that match those dimensions. You’ll need basic tools: a drill, saw, level, and measuring tape. The aluminum pieces bolt together using standard bolts and nuts rather than welding or special equipment.
Each wall panel weighs between 40 and 80 pounds depending on size, so you might want a second person helping during assembly. Installation takes patience more than strength. Most steps involve lining up holes, inserting bolts, and tightening them snugly without over-torquing.
Retrofit Screening for Existing Decks

If you have an existing deck but want to keep bugs out without building a permanent structure, retrofit screening gives you flexibility. You can install a Screeneze DIY kit with aluminum bases and removable vinyl caps available in bronze, sand, white, or clay.
The installation process is straightforward. Start by measuring your deck’s perimeter. Cut the aluminum bases to match your measurements, then join them end-to-end. For smaller sections, you can shorten the vinyl caps to fit the space properly.
Phifer BetterVue screen material works well for this project. It blocks insects while letting you see through clearly, so you maintain your view while staying protected from bugs.
The practical advantage of this approach is speed and flexibility. You can remove and reinstall screens in about ten minutes when weather changes, and replacing worn screens takes only five minutes. Pets stay contained within the screened area, sunlight still enters your space, and your sight lines remain unobstructed. This modular design lets you adjust your setup without major renovation work or permanent commitments.
Awnings for Doors and Windows
Think about how often rain or intense sun stops you from using your porch or patio. Awnings installed above doors and windows create sheltered zones that let you step outside comfortably, even during weather you’d normally avoid. An aluminum awning kit gives you both practical protection and a finished look that matches your home’s appearance.
How Aluminum Awnings Work
Aluminum awnings mount directly above entryways using standard installation hardware. The rigid metal frame blocks rain and reduces direct sunlight, which means less heat enters your home during summer months. This directly lowers your air conditioning costs because your system doesn’t have to work as hard. In winter, the awning still allows lower-angle sun to warm interior spaces when you want it.
Aluminum awnings reduce summer heat gain and lower cooling costs while still allowing winter sun to naturally warm your home.
These awnings pair well with screen room additions. The combination lets fresh air flow through while rain and insects stay out. You get the feeling of being outside with practical weather protection.
Installation and Customization
Most awning kits install in a single weekend with basic hand tools—a drill, level, and wrench handle the main work. No special equipment or professional licensing is required for residential installations. Awnings come in sizes ranging from 3 feet to 8 feet wide and 2 to 4 feet deep, matching standard door and window openings. You can select from neutral colors like tan, gray, and white, or choose colors that complement your siding or trim.
Get a free quote from a supplier to discuss measurements for your specific entryway and available color options that fit your budget.